Documentation Index
Fetch the complete documentation index at: https://docs.supatest.ai/llms.txt
Use this file to discover all available pages before exploring further.
Overview
Scenarios enable table-driven testing in Supatest. Instead of duplicating test cases for different inputs, define a single test and run it multiple times with different data sets. Each row in the scenarios table represents a unique test scenario with its own variable values.
This approach is ideal for:
- Testing login with multiple user accounts
- Validating form submissions with various input combinations
- Checking search functionality with different queries
- Testing payment flows with different amounts or methods
- Any test that follows the same steps but uses different data
Video overview
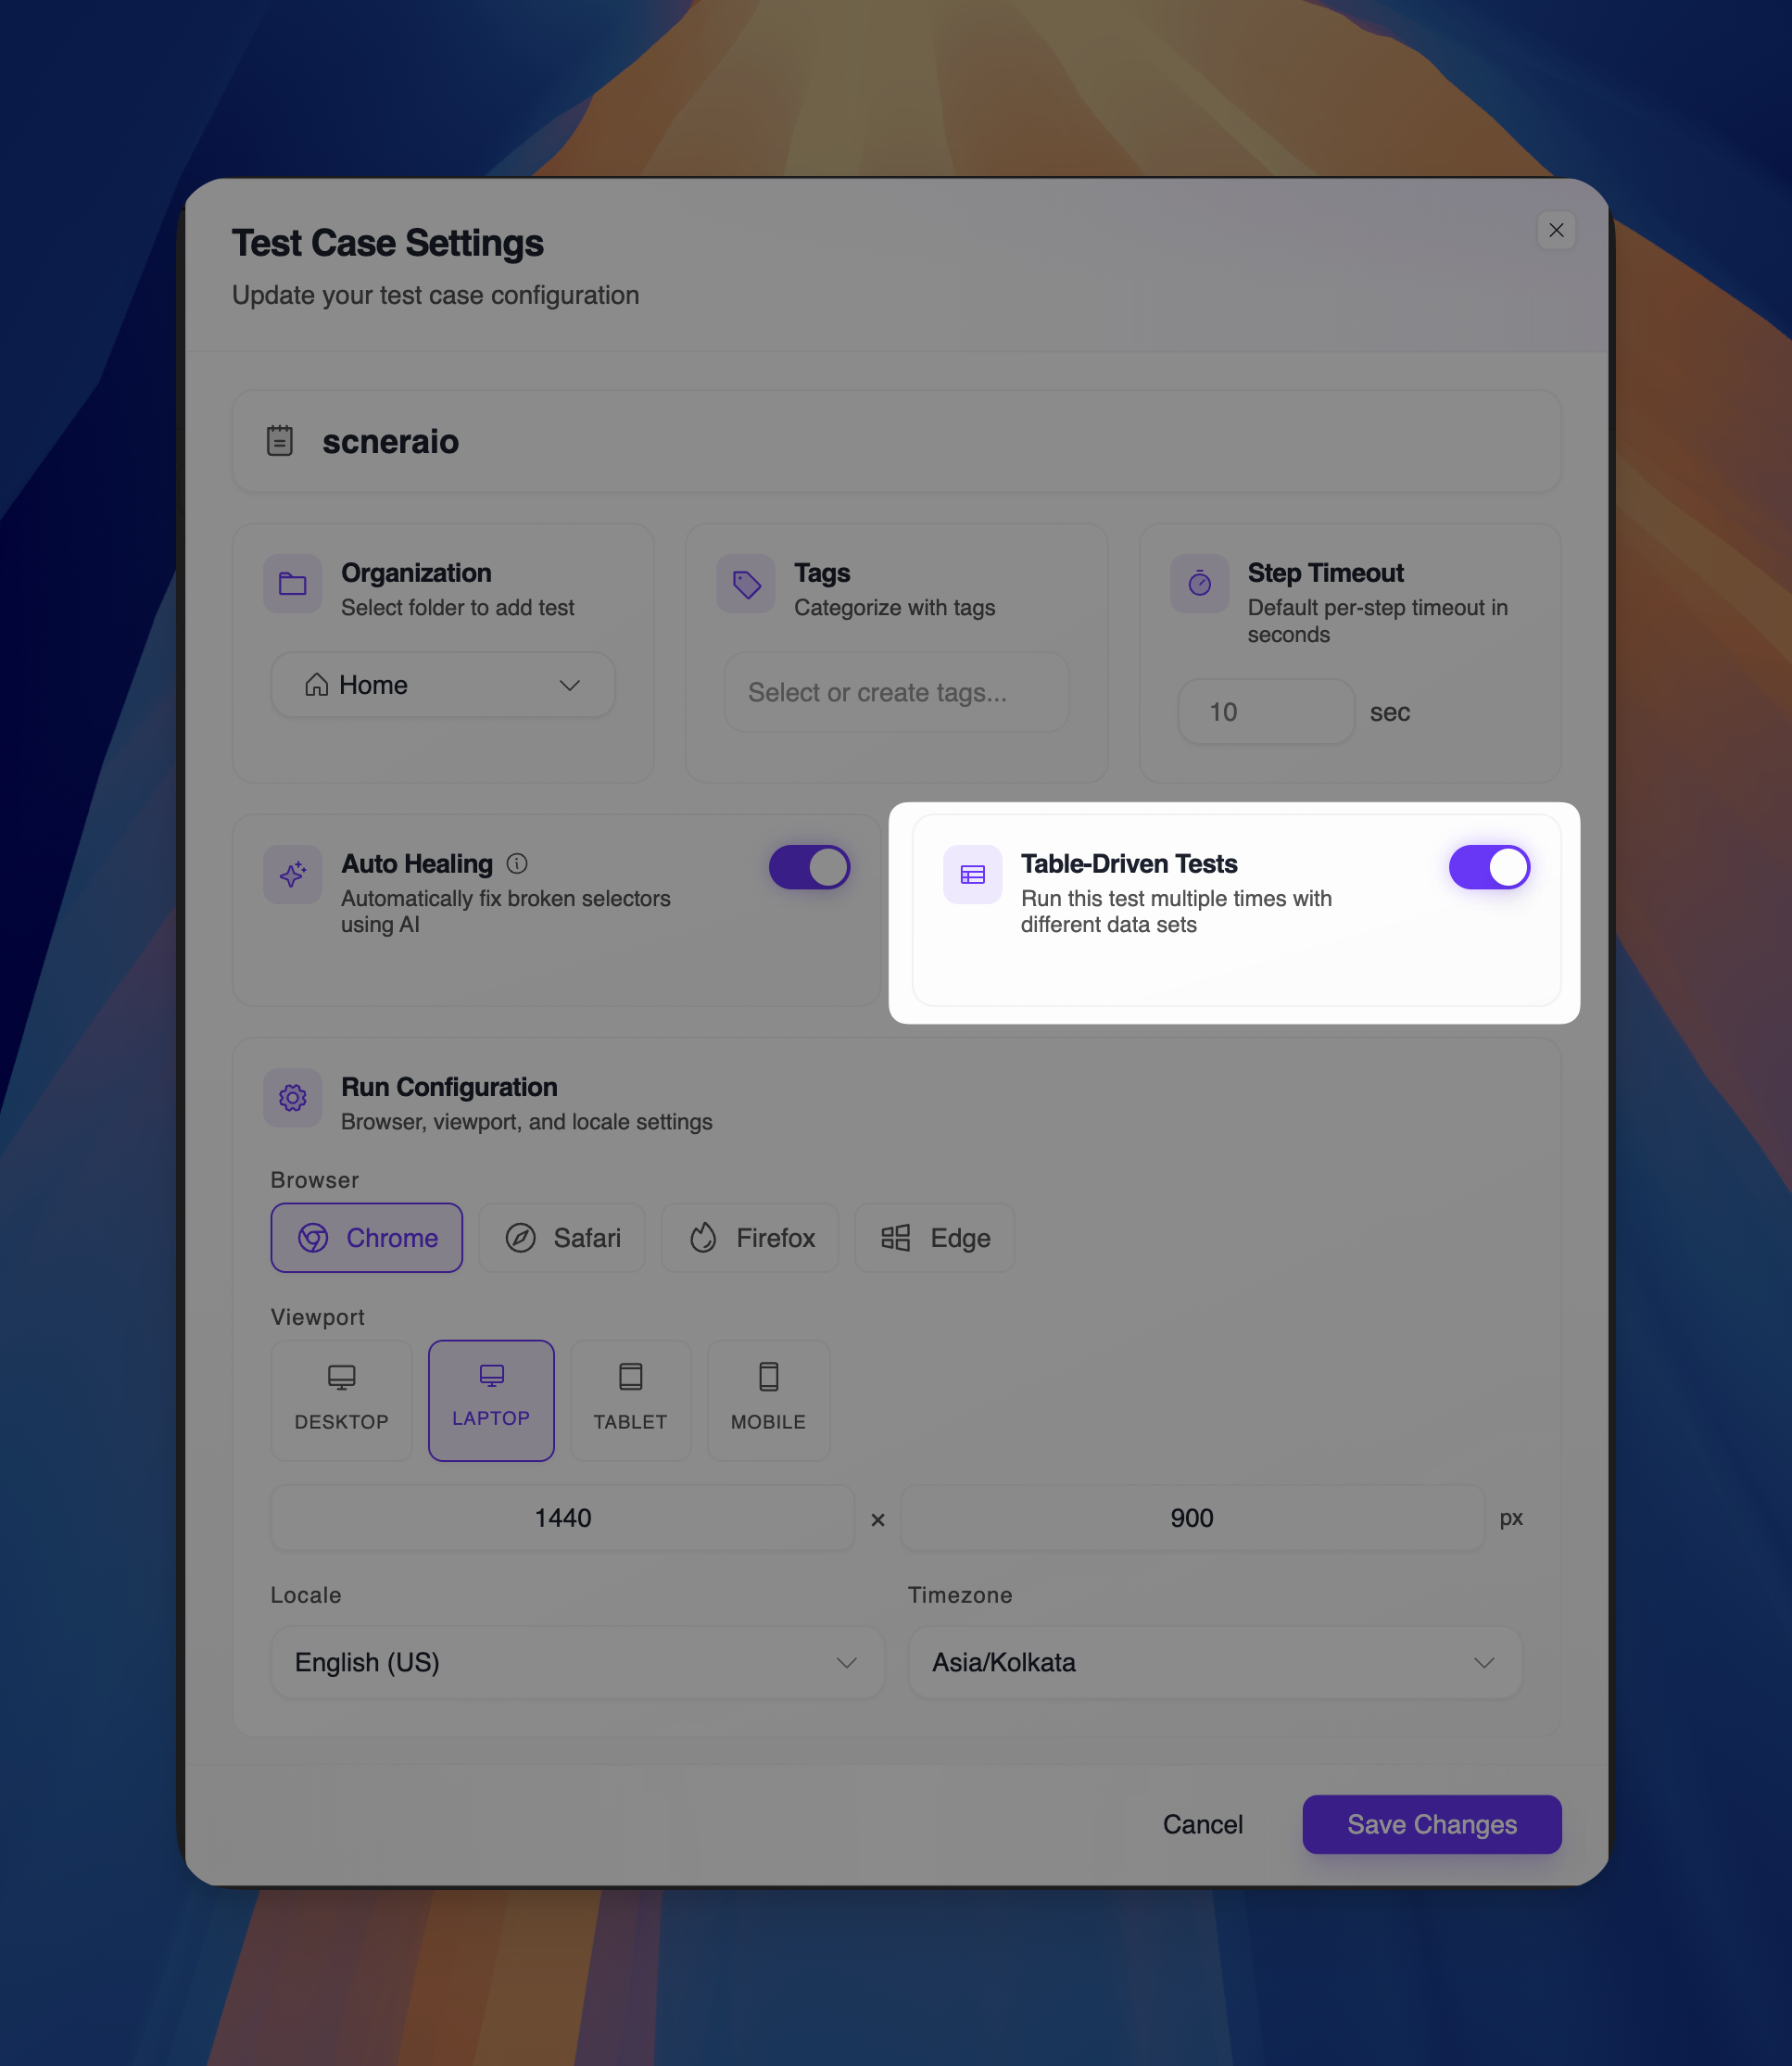
Enabling Scenarios
- Open a test case in the editor
- Click the Settings icon in the top-right corner
- Toggle on Table-Driven Tests
- Click the Scenarios tab to define your data
When enabled, you’ll see a message: “Scenarios are enabled. Edit test data in the Scenarios tab.”
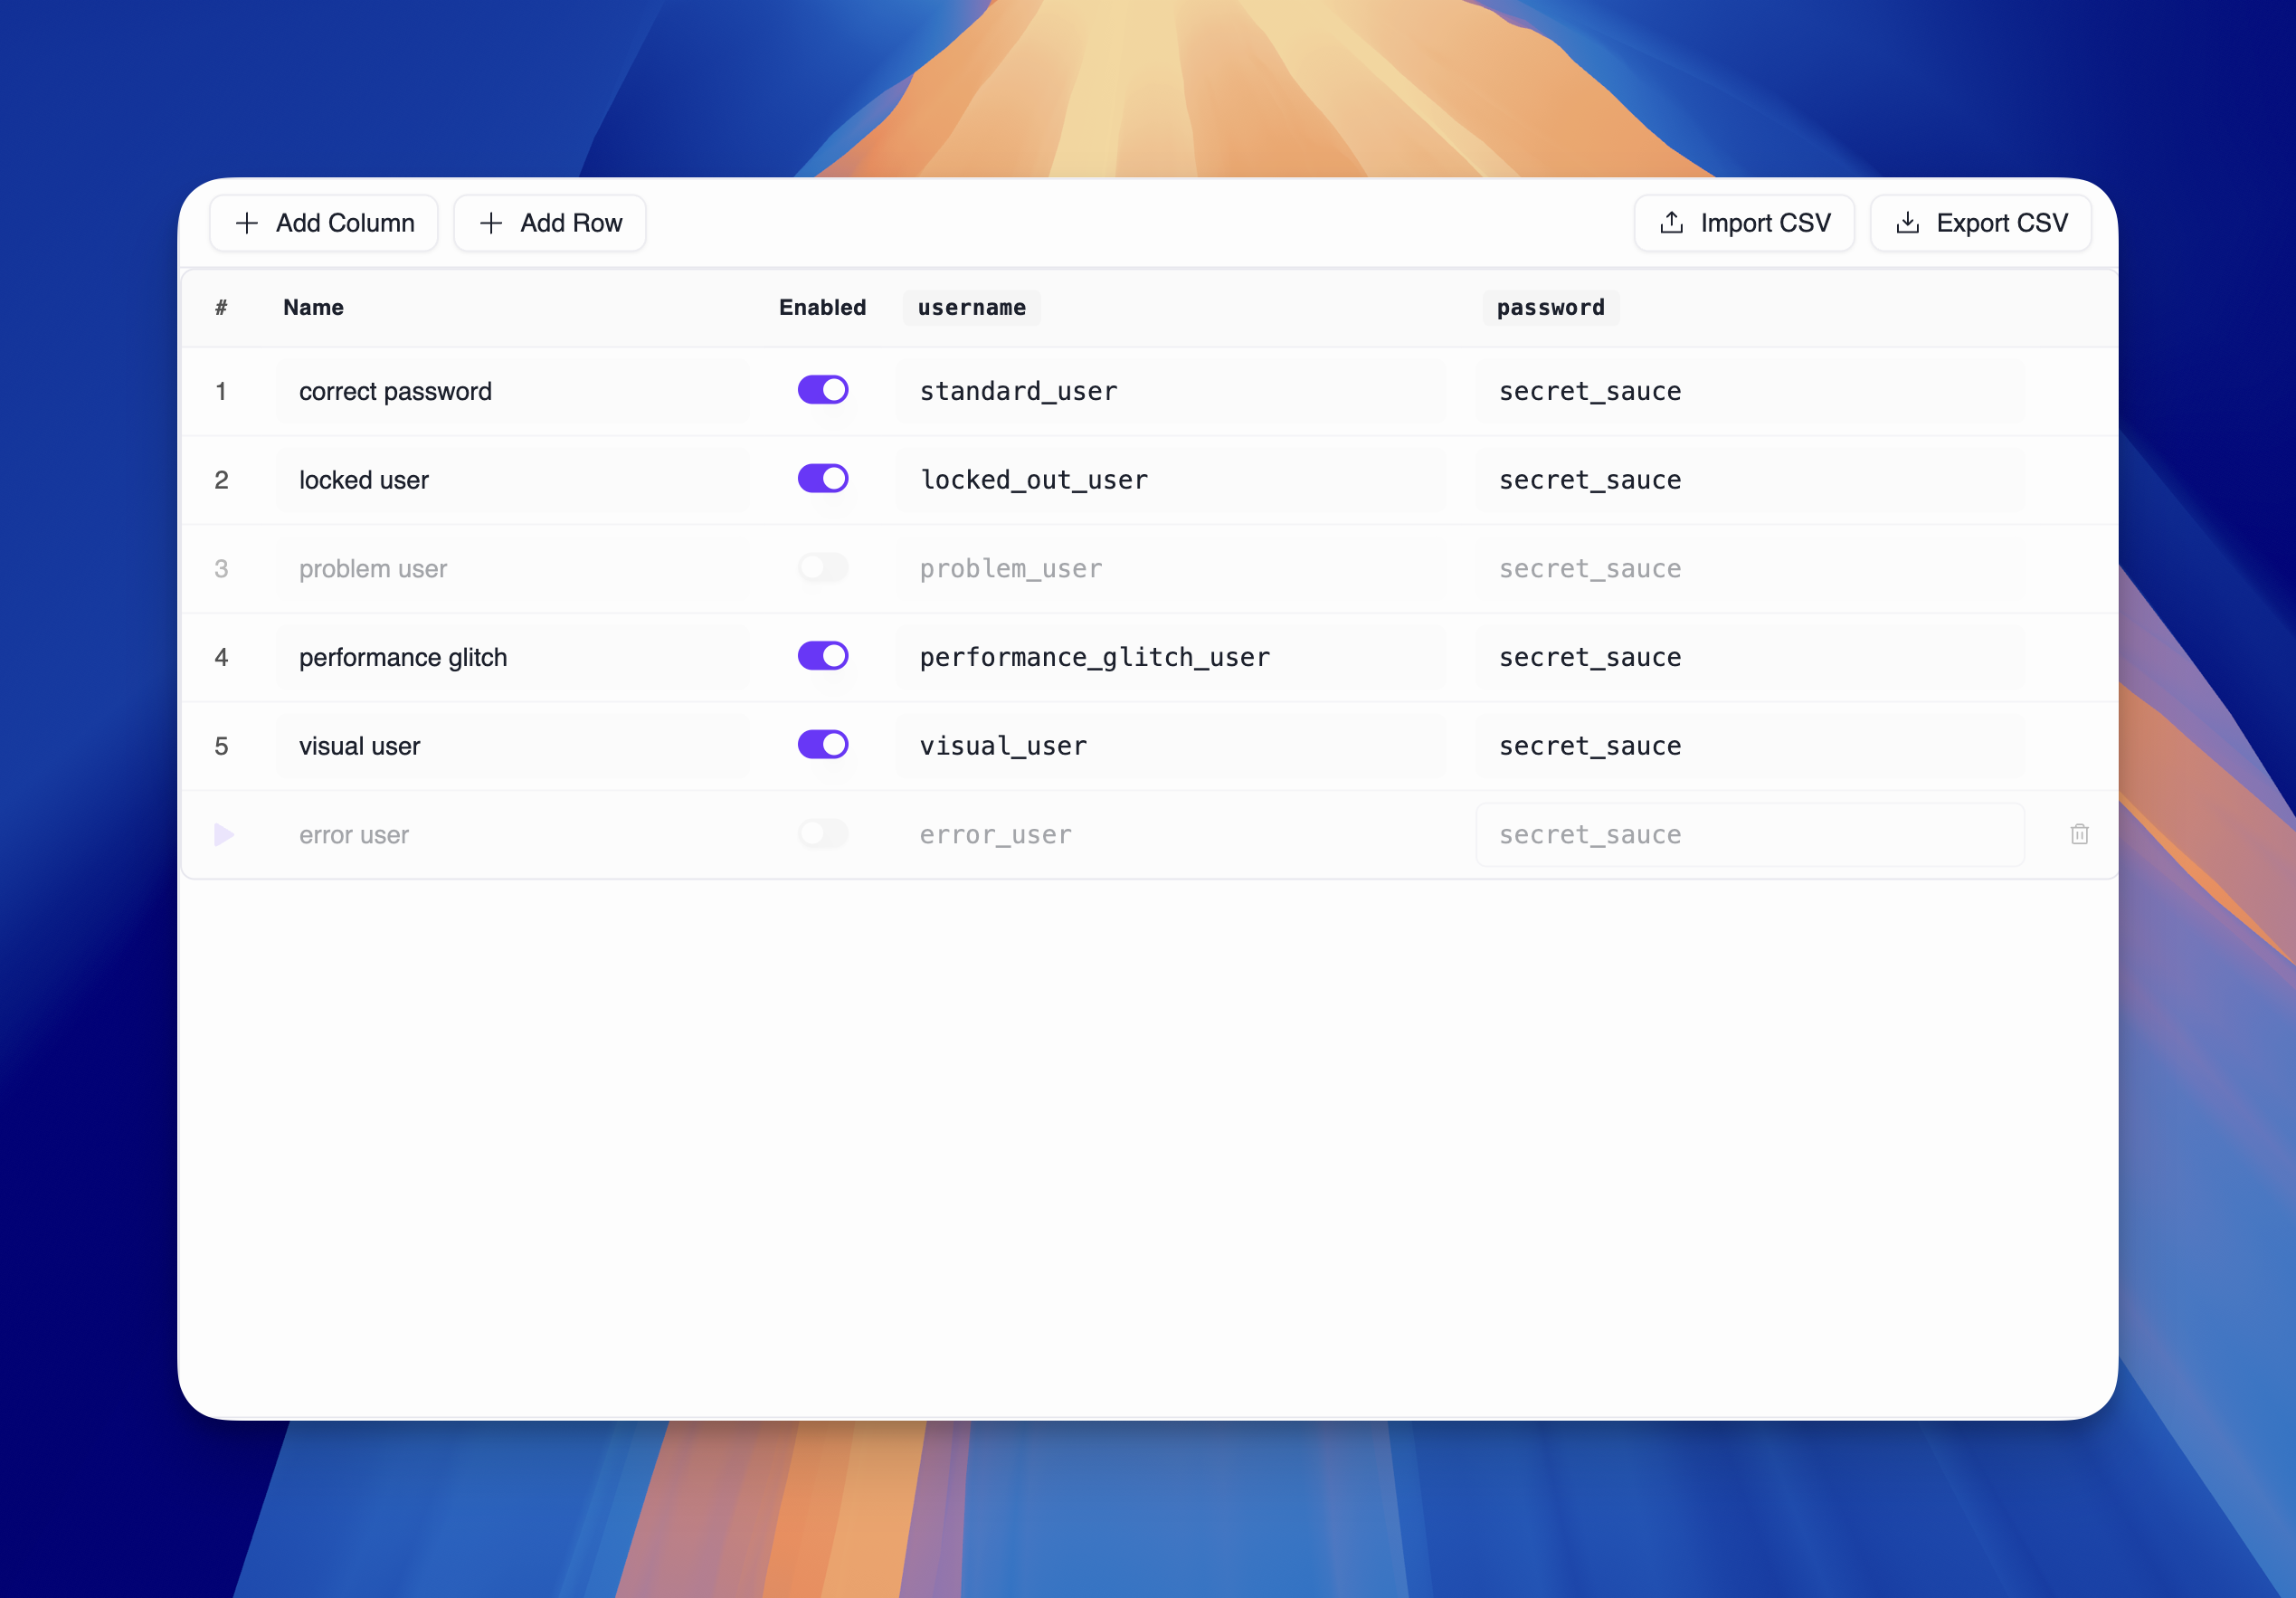
The Scenarios Tab
The Scenarios tab displays a table where you manage your test data:
| Column | Description |
|---|
| # | Row number (auto-generated) |
| Name | Descriptive name for the scenario (e.g., “valid user”, “admin login”) |
| Enabled | Toggle to include/exclude the scenario from test runs |
| Custom columns | Your variable columns (e.g., username, password, expected_result) |
Adding Columns
Click + Add Column to create a new variable column:
- Enter a column name (this becomes the variable name)
- The column is added to the table
- Fill in values for each scenario row
Column names become variables accessible via {{ scenarios.column_name }} in your test steps.
Adding Rows
Click + Add Row to create a new scenario:
- Enter a descriptive name in the Name column
- Ensure the Enabled toggle is on
- Fill in values for each variable column
Example Table
| # | Name | Enabled | username | password |
|---|
| 1 | correct user | On | standard_user | secret_sauce |
| 2 | normal | On | normal_user | test123 |
| 3 | admin login | On | admin | admin_pass |
| 4 | invalid user | On | invalid | wrong_pass |
Using Scenario Variables
Reference scenario variables in your test steps using the scenarios namespace:
{{ scenarios.username }}
{{ scenarios.password }}
Example: Login Test with Scenarios
Step 1: Navigate
URL: {{ env.BASE_URL }}/login
Selector: [data-test="username"]
Value: {{ scenarios.username }}
Selector: [data-test="password"]
Value: {{ scenarios.password }}
Selector: [data-test="login-button"]
Running Tests with Scenarios
When you run a test that has scenarios enabled:
- Supatest evaluates the active run configs for that execution
- For each enabled scenario row, it runs the browser/viewport matrix from those run configs
- Each concrete run executes independently with its own row data + runtime settings
- Results are grouped so you can inspect row-level and config-level outcomes
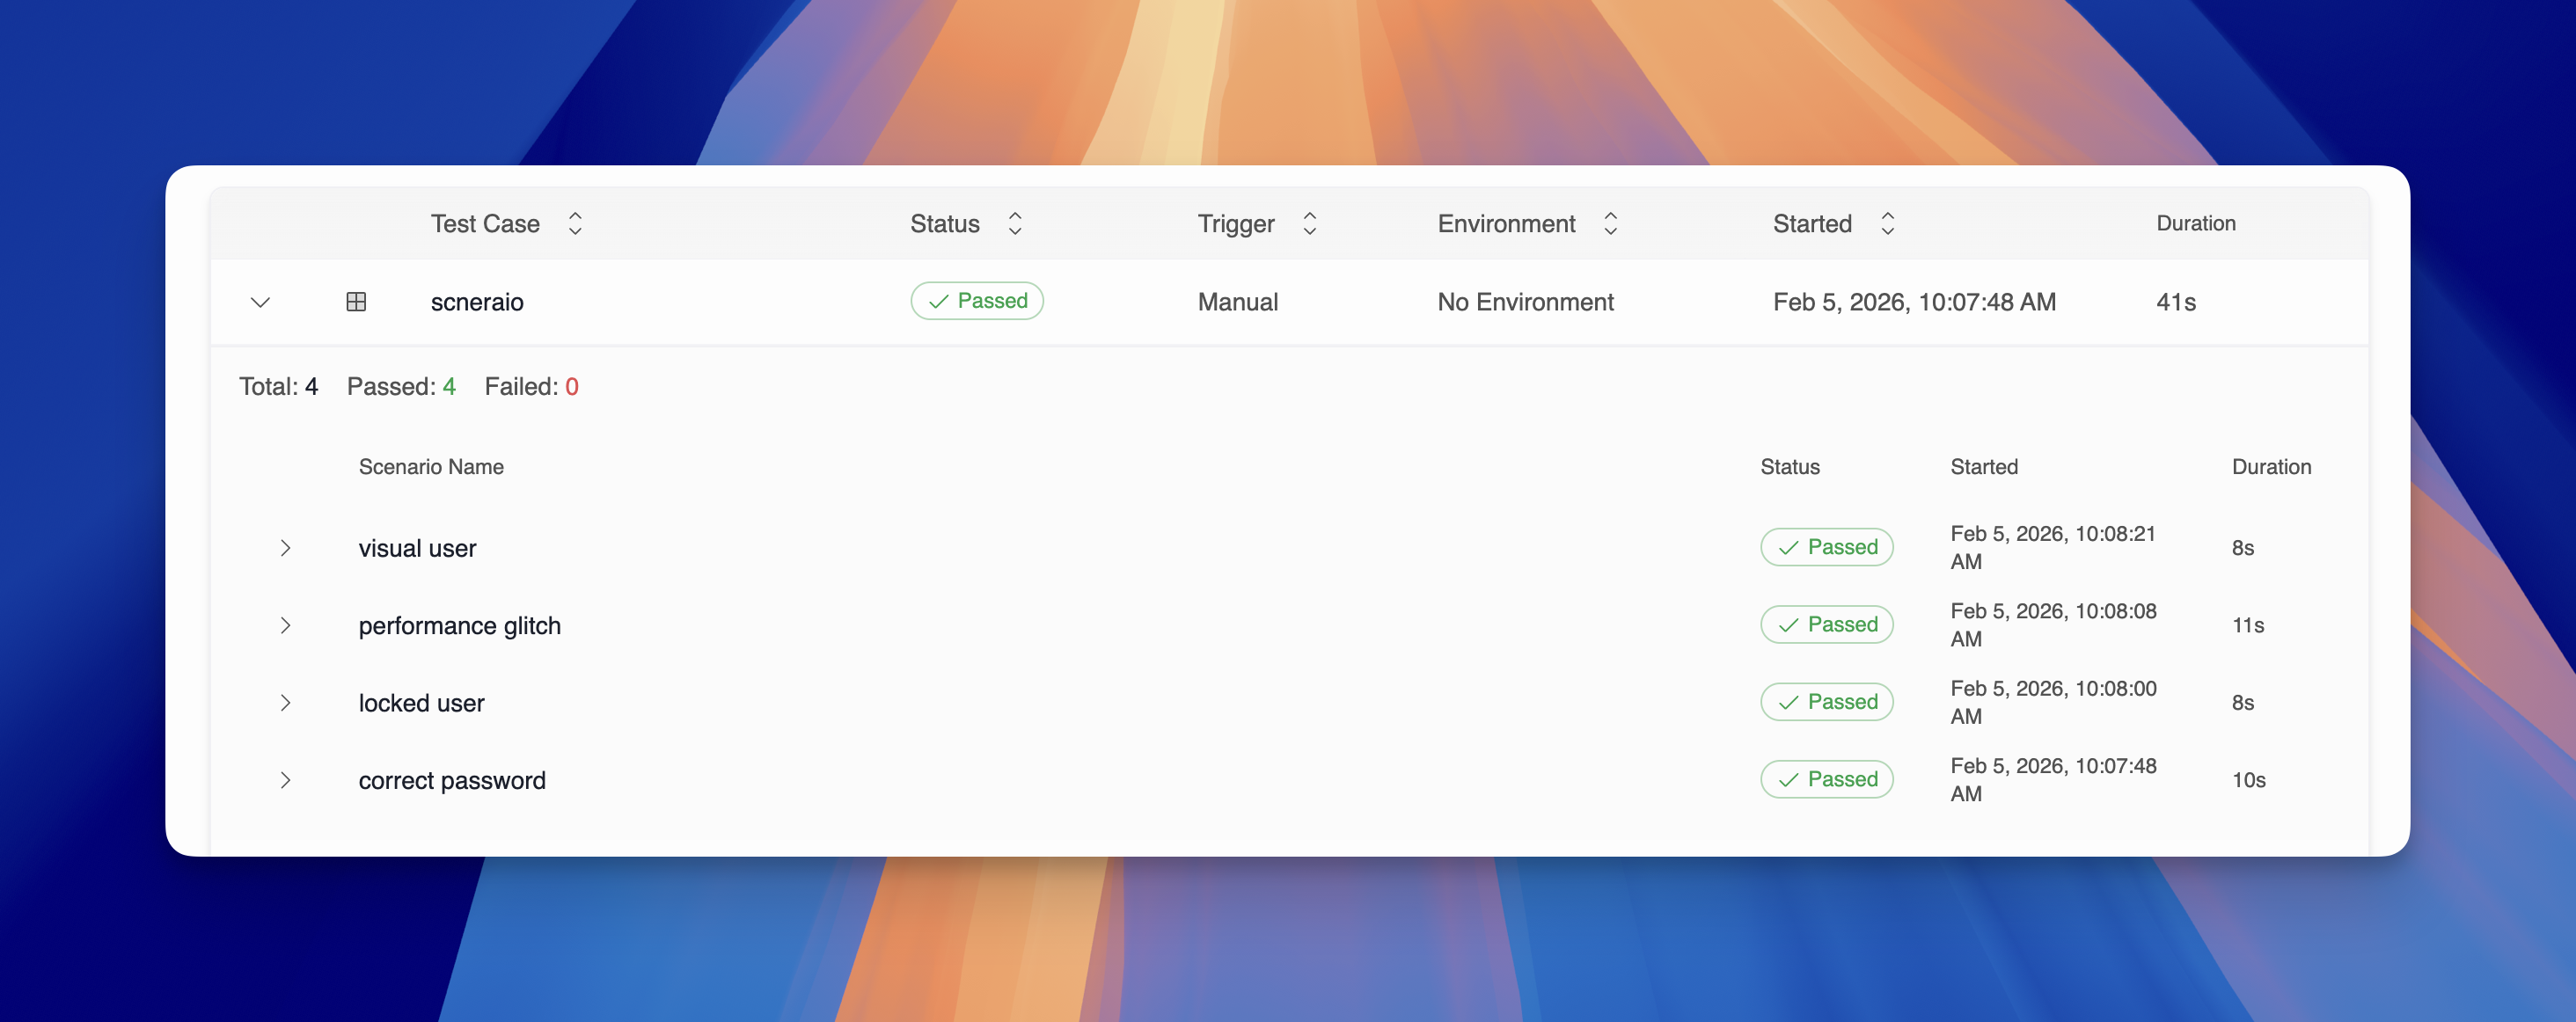
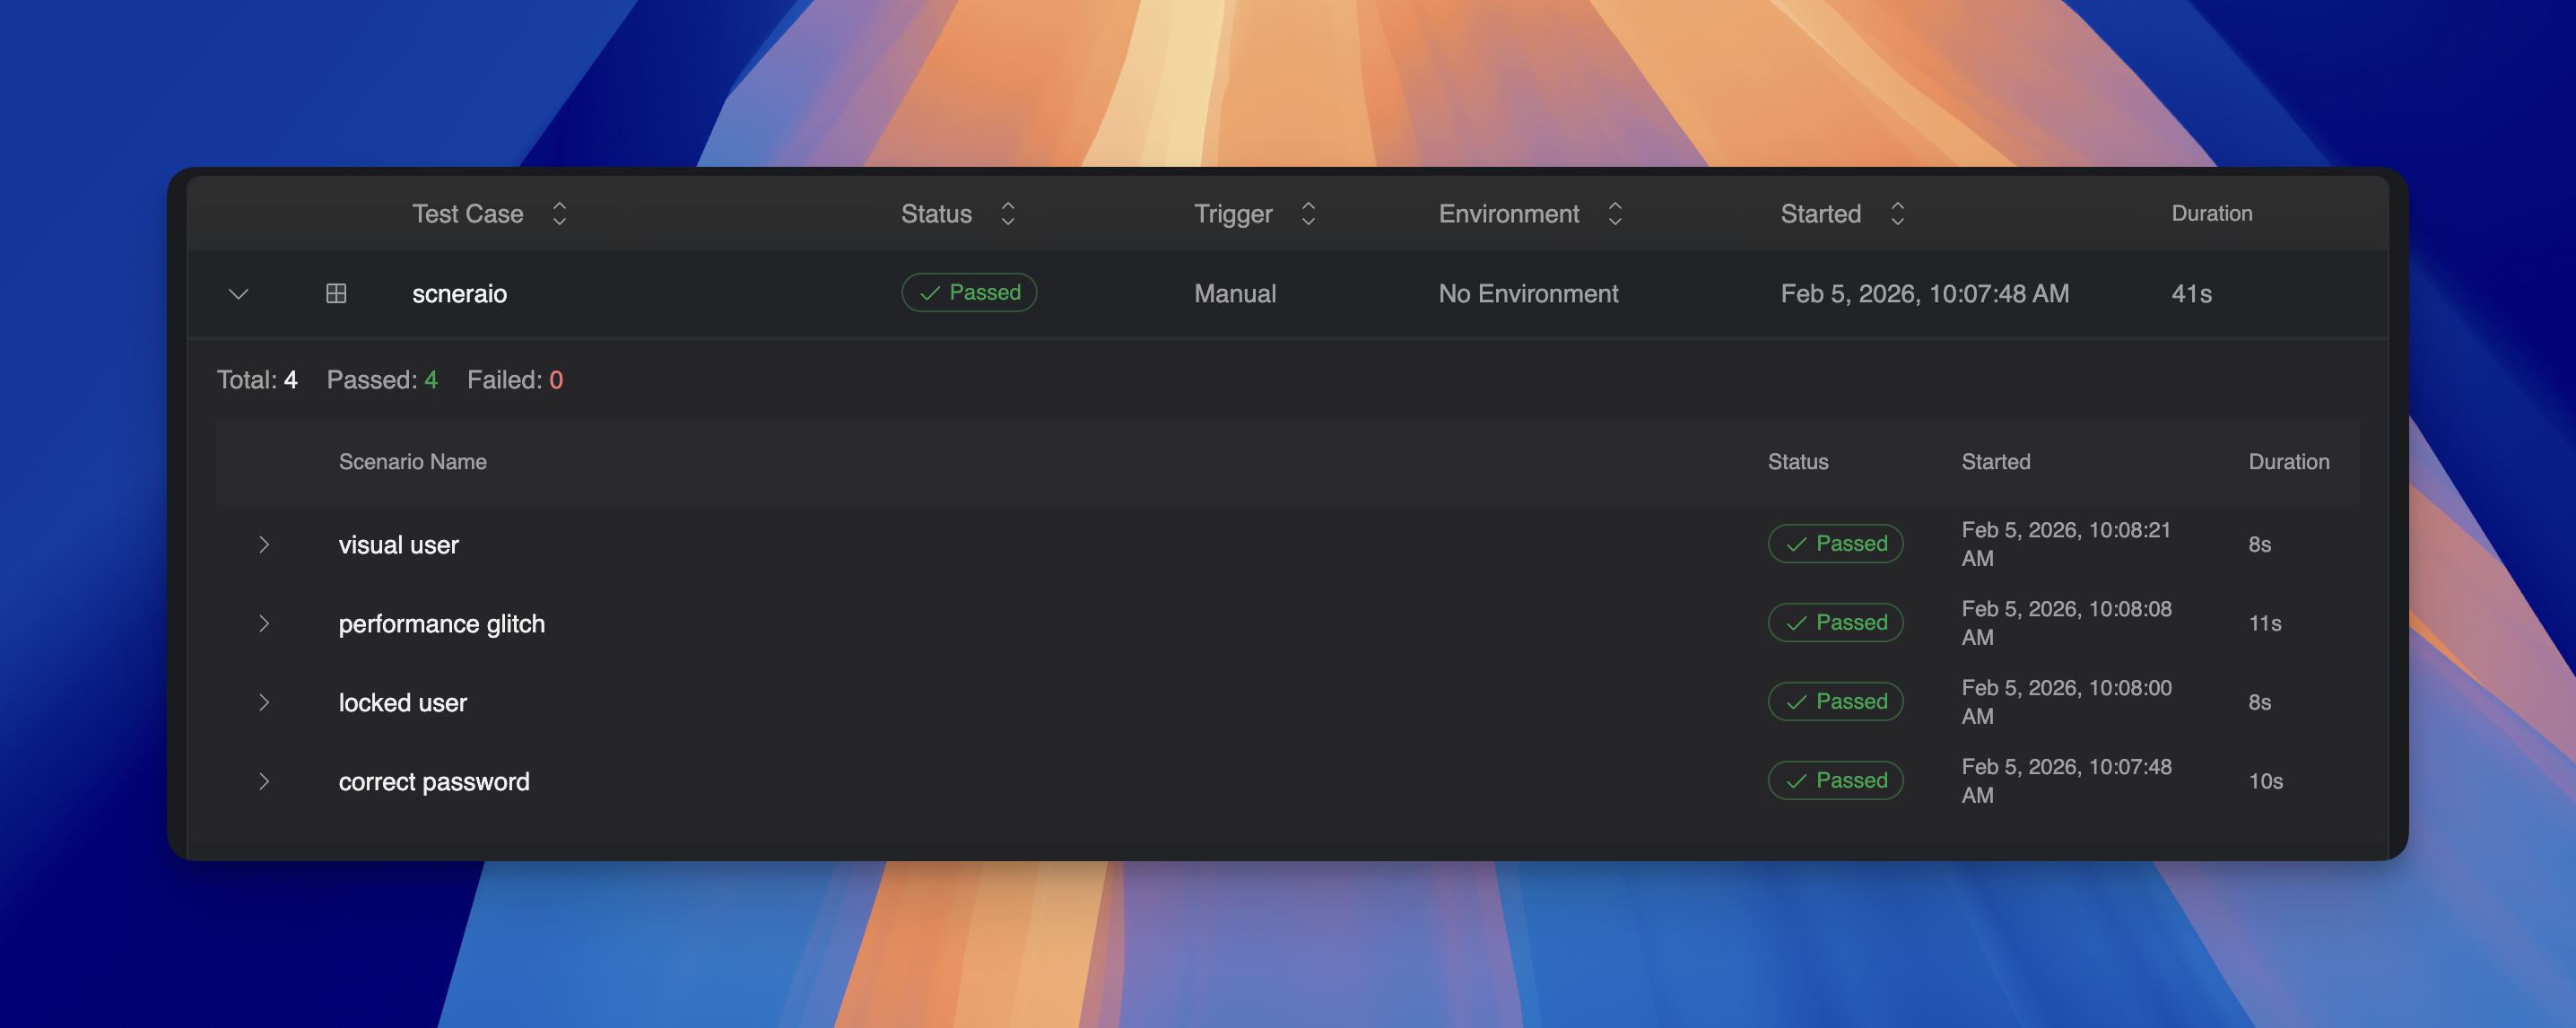
Understanding Results
After execution, the results display:
| Field | Description |
|---|
| Test Case | The parent test name with an expandable indicator |
| Status | Aggregated status for the scenario run |
| Total | Number of concrete runs generated (rows x configs x browsers x viewports) |
| Passed/Failed | Count of passed and failed concrete runs |
| Scenario Name | Status | Started | Duration |
|---|
| correct user | Passed | Feb 4, 2026, 01:13:08 PM | 14s |
| normal | Passed | Feb 4, 2026, 01:13:23 PM | 8s |
- run config
- browser
- viewport
- status
- started time
- duration
At a glance:
- Scenario Name: The name you defined in the table
- Status: Aggregated status for that scenario row
- Started: When the scenario began execution
- Duration: Total/aggregate duration for that row
Import and Export CSV
Manage your scenario data using CSV files:
Export CSV
- Click Export CSV in the Scenarios tab
- Save the file to your computer
- Use for backup, sharing, or editing in spreadsheet software
Import CSV
- Click Import CSV in the Scenarios tab
- Select a CSV file with matching column structure
- Scenarios are populated from the CSV data
CSV Format Requirements:
- First row must be column headers
- Must include
name and enabled columns
- Additional columns become variable columns
enabled values: true/false or 1/0
Example CSV:
name,enabled,username,password
correct user,true,standard_user,secret_sauce
normal,true,normal_user,test123
admin login,true,admin,admin_pass
Best Practices
Naming Scenarios
- Use descriptive names that explain what the scenario tests
- Good: “valid credentials”, “expired password”, “locked account”
- Avoid: “test1”, “scenario2”, “row3”
Organizing Variables
- Keep column names short but meaningful
- Use consistent naming:
user_email not userEmail in one and user-email in another
- Group related variables logically in the table
Managing Large Tables
- Disable scenarios temporarily instead of deleting them
- Use CSV export to version control your test data
- Split very large tables into multiple test cases if needed
Debugging Scenarios
- Run individual scenarios by disabling others
- Check variable names match exactly between table and expressions
- Verify all required columns have values for each row
Combining with Other Features
Scenarios + Environments
Use both for comprehensive coverage:
URL: {{ env.BASE_URL }}/login
Username: {{ scenarios.username }}
Scenarios + Loops
Scenarios iterate through rows; loops iterate within each scenario execution. Use loops when you need to repeat steps multiple times for a single scenario.
Scenarios + Conditionals
Add conditional logic that responds to scenario data:
Condition: {{ scenarios.user_type == 'admin' }}
  -> Verify admin dashboard visible
Otherwise:
  -> Verify user dashboard visible
Troubleshooting
Variable Not Found
- Verify the column name in the Scenarios tab matches your expression
- Check for typos and case sensitivity
- Ensure the column exists and has a value
Scenario Not Running
- Check that the scenario’s Enabled toggle is on
- Verify Table-Driven Tests is enabled in settings
- Ensure there’s at least one enabled scenario
Wrong Values Used
- Confirm you’re using
scenarios. prefix, not vars. or env.
- Check the scenario row that ran matches expected values
- Review CSV import if data was imported
All Scenarios Fail
- Test with a single scenario first to isolate issues
- Check that step selectors work with the provided data
- Verify environment variables are set correctly